本文演示 CentOS 7.6:Linux testerfans 3.10.0-1160.45.1.el7.x86_64
前言
在Linux Namespace:user(第一部分)中我们通过演示简单理解了什么是user namespace,本章我们将继续介绍user namespace的其他内容。
跨user ns中的user id信息
对于map文件来说,在父user namespace和子user namespac中打开子user namespace中进程的这个文件看到的都是同样的内容,但如果是在其他的user namespace中打开这个map文件,‘ID-outside-ns’表示的就是映射到当前user namespace的ID。
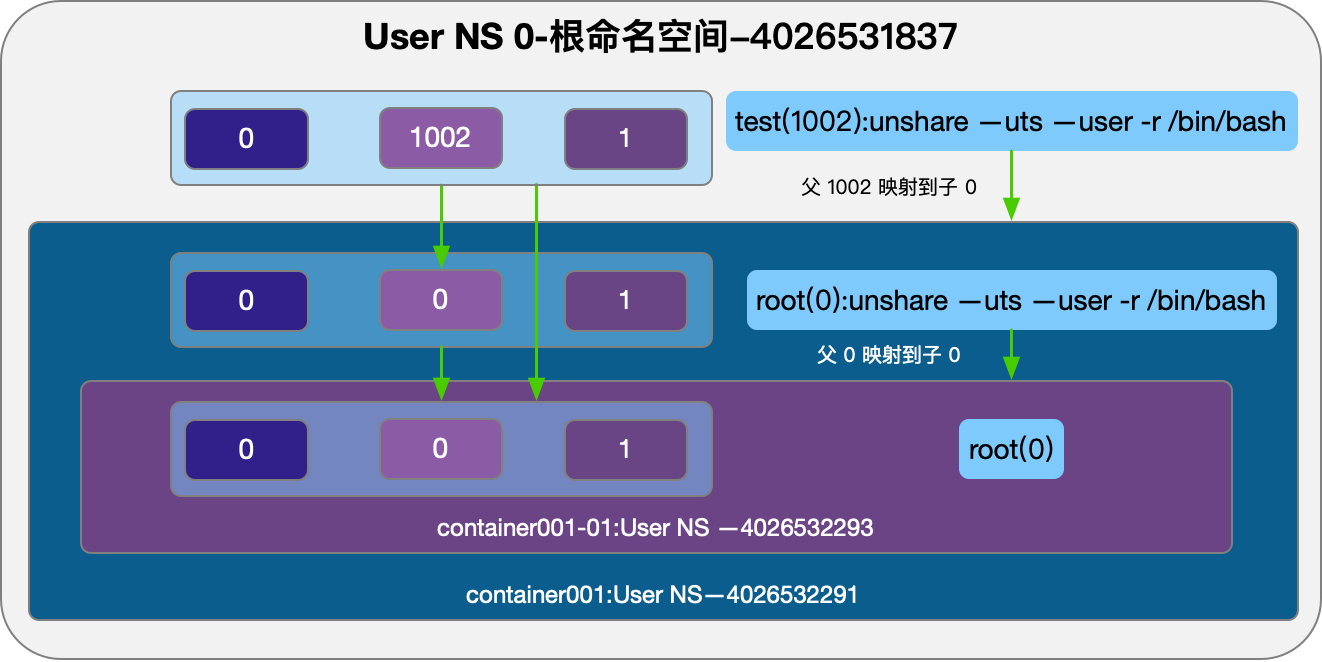
- 在shell1中使用test(1002)创建两层嵌套user namespace,与根user namespace形成父-子-孙关系。
#-------------------------------shell1-------------------------------
# 使用 -r 将test1002映射到子空间的root(0)
[test@VM-16-7-centos root]$ unshare --uts --user -r /bin/bash
[root@VM-16-7-centos root]# hostname container001
[root@VM-16-7-centos root]# exec bash
[root@container001 root]# echo $$
23700
[root@container001 root]# readlink /proc/$$/ns/user
user:[4026532291]
# 使用 -r 将子空间root(0)映射到孙子空间的root(0)
[root@container001 root]# unshare --uts --user -r /bin/bash
[root@container001 root]# hostname container001-1
[root@container001 root]# exec bash
[root@container001-1 root]# echo $$
24041
[root@container001-1 root]# readlink /proc/$$/ns/user
user:[4026532293]
- 打开一个shell窗口shell2,在shell2中获取子、孙的uid_map信息。
#-------------------------------shell2-------------------------------
[test@VM-16-7-centos root]$ cat /proc/23700/uid_map
         0       1002          1
[test@VM-16-7-centos root]$ cat /proc/24041/uid_map
         0       1002          1
从读取到的结果来看,在父命名空间内看到的子、孙命名空间都是0 1002 1的映射关系。
- 打开shell3窗口,使用
nsenter --user --uts -t 23700 --preserve-credentials /bin/bash进入到子命名空间,查看uid_map映射关系。
#-------------------------------shell3-------------------------------
[test@VM-16-7-centos root]$ nsenter --user --uts -t 23700 --preserve-credentials /bin/bash
[root@container001 root]# cat /proc/24041/uid_map
         0          0          1
--preserve-credentials进入用户命名空间时不要修改 UID 和 GID,需要root权限。否则会提示
nsenter: setgroups failed: Operation not permitted
- 在shell1内查看孙子命名空间映射关系。
#-------------------------------shell1-------------------------------
[root@container001-1 root]# cat /proc/24041/uid_map
         0          0          1
我们将上面的操作和查看到的结果总结如下:在当前命名空间下看子孙命名空间下的uid映射关系看到的是自己空间下的user id。

在父命名空间通过-r参数将test(1002)映射到子空间root(0),子空间通过-r参数将自己的root(0)映射到了孙子空间root(0)。我们在父命名空间视图看到子孙映射关系都是0 1002 1。在子命名空间查看孙子空间关系是 0 0 1。
user namespace的所有者
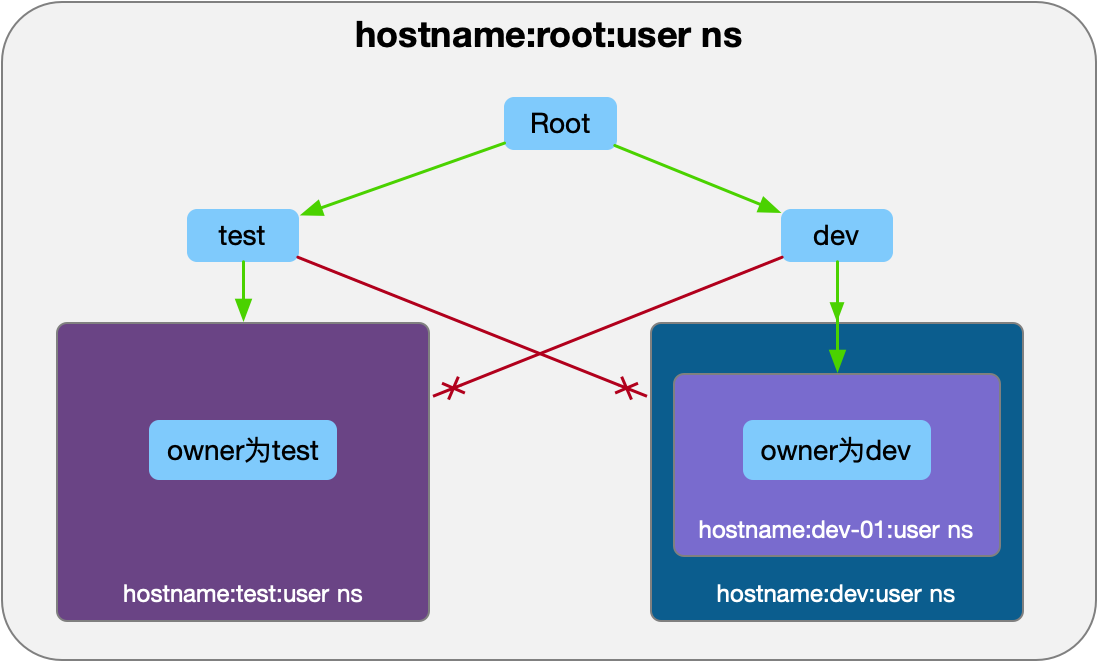
当一个用户创建一个新的user namespace的时候,这个用户就是这个新user namespace的owner,在父user namespace的这个用户就会拥有新user namespace及其所有子孙user namespace的所有capabilities。
- 首先创建一个新的账号dev并将dev加入到管理员组内,让dev可以通过sudo提升权限。
[root@VM-16-7-centos ~]# useradd dev
[root@VM-16-7-centos ~]# passwd dev
Changing password for user dev.
New password:
Retype new password:
passwd: all authentication tokens updated successfully.
[root@VM-16-7-centos ~]# usermod -g wheel dev
You have new mail in /var/spool/mail/root
- 打开一个shell为shell1,在shell1内使用test用户创建一个user namespace,hostname为test。
#-------------------------------shell1-------------------------------
[root@VM-16-7-centos ~]# su test
[test@VM-16-7-centos root]$ unshare --user --uts -r /bin/bash
[root@VM-16-7-centos root]# hostname test
[root@VM-16-7-centos root]# exec bash
[root@test root]# readlink /proc/$$/ns/user
user:[4026532291]
[root@test root]# echo $$
11373
- 打开一个shell为shell2,在shell2中使用dev用户创建一个user namespace,hostname为dev。
#-------------------------------shell2-------------------------------
[root@VM-16-7-centos ~]# su dev
[dev@VM-16-7-centos root]$ unshare --user --uts -r /bin/bash
[root@VM-16-7-centos root]# hostname dev
[root@VM-16-7-centos root]# exec bash
[root@dev root]# readlink /proc/$$/ns/user
user:[4026532293]
[root@dev root]# echo $$
11717
- 打开一个shell为shell3,在shell3中使用dev用户使用unshare分别加入hostname为test/dev中新建的user namespace中。
#-------------------------------shell3-------------------------------
[dev@VM-16-7-centos root]$ nsenter --user -t 11717 --preserve-credentials --uts /bin/bash
[root@dev root]# id
uid=0(root) gid=65534 groups=65534
[root@dev root]# readlink /proc/$$/ns/user
user:[4026532293]
[root@dev root]# exit
exit
[dev@VM-16-7-centos root]$ nsenter --user -t 11373 --preserve-credentials --uts /bin/bash
nsenter: cannot open /proc/11373/ns/user: Permission denied
从结果上来看,在shell3中使用dev用户加入到dev用户创建的user namespace成功,加入到test用户创建的user namespace失败。
- 在shell3中提升dev到root权限,使用unshare加入到test创建的user namespace。
#-------------------------------shell3-------------------------------
[dev@VM-16-7-centos root]$ sudo nsenter --user -t 11373 --preserve-credentials --uts /bin/bash
[sudo] password for dev:
/usr/bin/id: cannot find name for group ID 65534
/usr/bin/id: cannot find name for user ID 65534
[I have no name!@test ~]$ id
uid=65534 gid=65534 groups=65534
[I have no name!@test ~]$ readlink /proc/$$/ns/user
user:[4026532291]
[I have no name!@test ~]$ exit
exit
root用户加入到test创建的user namespace成功,因为root用户并未映射到hostname为test内,所以这里我们看到的都是65534。
- 在shell2中我们继续创建一个孙子user namespace,hostname修改为dev-01。
#-------------------------------shell2-------------------------------
[root@dev root]# unshare --user --uts -r /bin/bash
[root@dev root]# hostname dev-01
[root@dev root]# exec bash
[root@dev-01 root]# readlink /proc/$$/ns/user
user:[4026532295]
[root@dev-01 root]# echo $$
15868
- 在shell3中我们使用dev账号通过unshare方法加入到dev-01的user namespace中。
#-------------------------------shell3-------------------------------
[dev@VM-16-7-centos root]$ nsenter --user -t 15868 --preserve-credentials --uts /bin/bash
[root@dev-01 root]# readlink /proc/$$/ns/user
user:[4026532295]
加入成功,我们使用dev账号成功加入了dev创建的子、孙 usernamespace中,说明dev拥有孙子user namespace的capabilities。

简单总结一下,一个新user namespace的创建者,是这个user namespace的所有者。这个所有者对这个user namespace和子孙user namespace都有所有的capabilities。root用户具备系统内所有user namespace的capabilities。
user namespace和其他namespace的关系
Linux 下的每个 namespace,都有一个 user namespace 与之关联,这个 user namespace 就是创建相应 namespace 时进程所属的 user namespace,相当于每个 namespace 都有一个 owner(user namespace),这样保证对任何 namespace 的操作都受到 user namespace 权限的控制。这也是为什么在子 user namespace 中设置 hostname 失败的原因,因为要修改的 uts namespace 属于的父 user namespace,而新 user namespace 的进程没有老 user namespace 的任何 capabilities。
以 uts namespace 为例,在 uts_namespace 的结构体中有一个指向 user namespace 的指针,指向它所属的 user namespace。
查看的代码路径在/usr/src/kernels/3.10.0-1160.62.1.el7.x86_64/include/linux/
- 读取utsname.h文件,查看uts namespace数据结构包含struct user_namespace *user_ns。
struct uts_namespace {
        struct kref kref;
        struct new_utsname name;
        struct user_namespace *user_ns;
        unsigned int proc_inum;
        RH_KABI_EXTEND(struct ucounts *ucounts)
};
- 查看ipc_namespace.h文件包含struct user_namespace *user_ns。
struct ipc_namespace {
        atomic_t        count;
        struct ipc_ids  ids[3];

        int             sem_ctls[4];
        int             used_sems;

        unsigned int    msg_ctlmax;
        unsigned int    msg_ctlmnb;
        unsigned int    msg_ctlmni;
        atomic_t        msg_bytes;
        atomic_t        msg_hdrs;

        size_t          shm_ctlmax;
        size_t          shm_ctlall;
        unsigned long   shm_tot;
        int             shm_ctlmni;
        /*
         * Defines whether IPC_RMID is forced for _all_ shm segments regardless
         * of shmctl()
         */
        int             shm_rmid_forced;

        struct notifier_block ipcns_nb;

        /* The kern_mount of the mqueuefs sb.  We take a ref on it */
        struct vfsmount *mq_mnt;

        /* # queues in this ns, protected by mq_lock */
        unsigned int    mq_queues_count;

        /* next fields are set through sysctl */
        unsigned int    mq_queues_max;   /* initialized to DFLT_QUEUESMAX */
        unsigned int    mq_msg_max;      /* initialized to DFLT_MSGMAX */
        unsigned int    mq_msgsize_max;  /* initialized to DFLT_MSGSIZEMAX */
        unsigned int    mq_msg_default;
        unsigned int    mq_msgsize_default;

        /* user_ns which owns the ipc ns */
        struct user_namespace *user_ns;

        unsigned int    proc_inum;
        RH_KABI_EXTEND(struct ucounts *ucounts)
};
- 查看pid_namespace.h内包含struct user_namespace *user_ns。
struct pid_namespace {
        struct kref kref;
        struct pidmap pidmap[PIDMAP_ENTRIES];
        int last_pid;
        unsigned int nr_hashed;
        struct task_struct *child_reaper;
        struct kmem_cache *pid_cachep;
        unsigned int level;
        struct pid_namespace *parent;
#ifdef CONFIG_PROC_FS
        struct vfsmount *proc_mnt;
        struct dentry *proc_self;
#endif
#ifdef CONFIG_BSD_PROCESS_ACCT
        RH_KABI_REPLACE(struct bsd_acct_struct *bacct,
                        struct fs_pin *bacct)
#endif
        struct user_namespace *user_ns;
        struct work_struct proc_work;
        kgid_t pid_gid;
        int hide_pid;
        int reboot;     /* group exit code if this pidns was rebooted */
        unsigned int proc_inum;
        RH_KABI_EXTEND(struct rcu_head rcu)
        RH_KABI_EXTEND(struct ucounts *ucounts)
};
总结
在本篇中我们主要介绍了:
- user namespace在uid的映射关系在不同层级的namespace内有所不同。
- user namespace的owner和owner的capabilities差异。
- user namespace和其他user namespace的关系。
到此为止我们已经了解了Linux内6个基本命名空间,分别为uts namespace、mount namespace、IPC namespace、PID namespace、network namespace和user namespace。接下来我们将继续学习Docker依赖的底层技术:Cgroups。
本文参考:
Linux Namespace系列(08):user namespace (CLONE_NEWUSER) (第二部分)


评论区