本文演示 CentOS 7.6:Linux testerfans 3.10.0-1160.45.1.el7.x86_64
前言
PID namespace在2.6.24由OpenVZ团队加入Linux中,PID Namespace中的进程ID是独立的,以达到不同命名空间下PID资源隔离的目的。PID Namespace在最初引入是为了解决容器的热迁移问题,因为不同命名空间下的PID可重复,这样在容器迁移的时候进程ID就不会冲突并且不会改变。
PID Namespace的特点
- 进程所属的PID namespace在创建的时候就已经确定了,使用unshare/nsenter时不会改变父进程的PID命名空间。
- PID namespace存在嵌套(父子关系),在父namespace内创建的PID命名空间是当前命名空间的子命名空间。
- 父namespace可以查看子孙后代命名空间内的进程信息,相反则不可以。
- PID namespace最多可以嵌套32层,由内核中的宏MAX_PID_NS_LEVEL来定义。

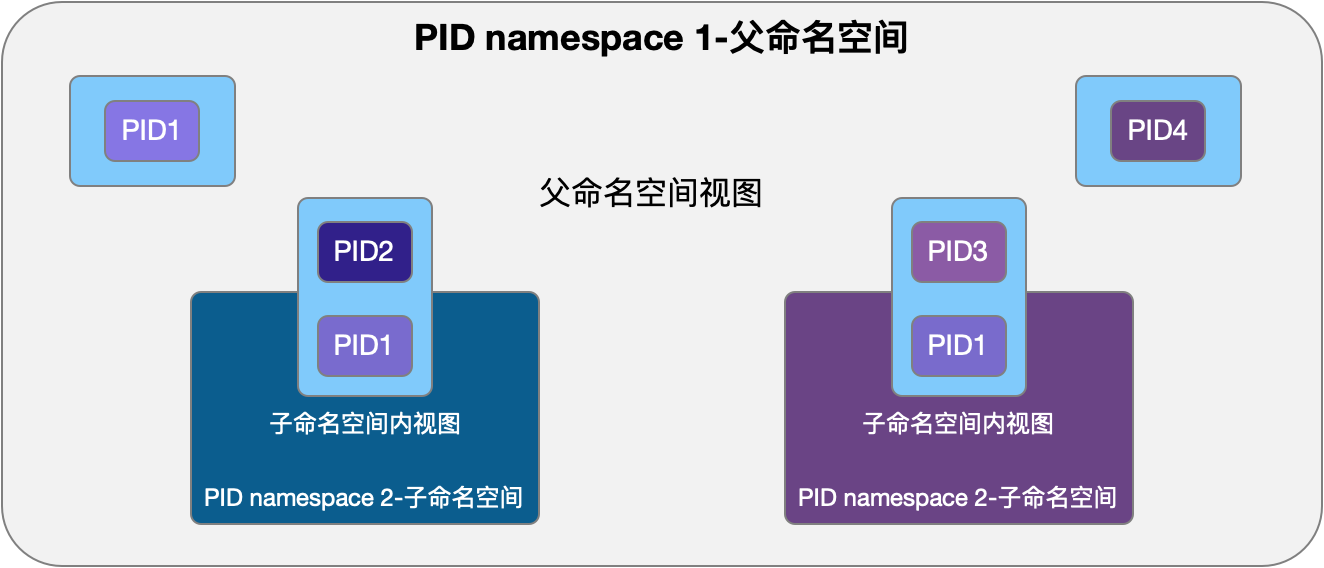
在上图中,有三个 PID namespace—一个父命名空间和两个子命名空间。在父命名空间中有PID1到PID4四个进程,在父命名空间视图下这4个进程可以共享资源并互相可见。
父命名空间中PID2和PID3子进程也有属于它们自己的 PID namespace,它们的 PID 为 1。从子命名空间视图内,PID1进程无法看到父命名空间内的进程信息。例如,两个子命名空间中的PID1都看不到父命名空间中的PID4。
PID namespace演示
- 查看当前进程信息。
#-------------------------------shell1-------------------------------
[root@testerfans ~]# echo $$ && readlink /proc/$$/ns/pid
17554
pid:[4026531836]
- 创建新PID namespace,并修改hostname为tester1。
#-------------------------------shell1-------------------------------
[root@testerfans ~]# unshare --uts  --mount --pid --fork /bin/bash
[root@testerfans ~]# hostname tester1
[root@testerfans ~]# exec bash
- --uts 修改hostname以作区别。
- --mount 隔离新进程的挂载信息,不对其他进程产生影响。
- --pid 创建新的pid命名空间。
- --fork /bin/bash fork 指定程序作为 unshare 的子进程,而不是直接运行它。
--fork 是为了让 unshare 进程 fork 一个新的进程,再用 /bin/bash 替换掉新的进程。这是由于进程所属的 PID namespace 在它创建的时候就确定了,不能进行更改,所以调用 unshare 和 nsenter 等命令后,原进程还是属于老的 PID namespace,新 fork 出来的进程才属于新的 PID namespace。
- 使用
echo $$ && readlink /proc/$$/ns/pid查看当前进程PID和PID namespace。
#-------------------------------shell1-------------------------------
[root@tester1 ~]# echo $$ && readlink /proc/$$/ns/pid
1
pid:[4026531836]
- 查看进程关系,当前bash进程是unshare进程的子进程。
#-------------------------------shell1-------------------------------
[root@tester1 ~]# pstree -pl | grep 17554
           |-sshd(1081)---sshd(17547)-+-bash(17554)---unshare(29081)---bash(29082)-+-grep(5830)

PID为1说明当前bash是当前PID命名空间下的第一个进程,但为什么当前pid namespace[4026531836]和老的PID namespace依然相同呢?
如果还记得Linux Namespace:Mount一章介绍的 unshare --propagation用法,就应该知道当我们使用unshare --mount在默认情况下我们会完全拷贝老的挂载点信息,并且shared subtrees属性设置为private。
此时我们明白了,为什么我们已经加入到新的PID namespace但为什么查到的PID namespace 还是老的了,那如何解决这个问题呢?我们将proc文件进行重新挂载即可。
重新挂载/proc
- 执行重新挂载后我们发现查看到的PID namespace已经变成了最新的。
#-------------------------------shell1-------------------------------
[root@tester1 ~]# mount -t proc proc /proc
[root@tester1 ~]# echo $$ && readlink /proc/$$/ns/pid
1
pid:[4026532293]
在unshare命令中实际已经提供了直接挂载proc的指令 --mount-proc指令,所以我们可以把下面这两条指令变成一条。通过再次打开一个shell进行对比可以看出效果。
#-------------------------------shell1-------------------------------
[root@tester1 ~]# unshare --uts  --mount --pid --fork /bin/bash
[root@tester1 ~]# mount proc proc /proc
-------------------------------shell2-------------------------------
[root@testerfans ~]# unshare --uts  --mount  --mount-proc --pid --fork /bin/bash

PID namespace 的嵌套
-
调用unshare或者setns函数后,当前进程的namespace不会发生变化,不会加入到新的namespace,而它的子进程会加入到新的namespace。
-
进程属于哪个namespace是在进程创建的时候决定的,并且以后再也无法更改。
-
在一个PID namespace里的进程,它的父进程可能不在当前namespace中,而是在外面的祖先namespace里面,这类进程的ppid都是0。
-
可以在祖先namespace中看到子namespace的所有进程信息,且可以发信号给子namespace的进程,但进程在不同namespace中的PID是不一样的。

PID namespace嵌套演示
为了方便演示,我们打开两个shell窗口,分别为shell1和shell2。
- shell1查看当前进程信息,我们看到当前进程的PID为17554,PID namespace为4026531836。
#-------------------------------shell1-------------------------------
[root@testerfans ~]# echo $$ && readlink /proc/$$/ns/pid
17554
pid:[4026531836]
- shell1中我们执行三次
unshare --pid --mount-proc --fork /bin/bash命令,创建三层嵌套的PID命名空间,并查看。
#-------------------------------shell1-------------------------------
[root@testerfans ~]# unshare --pid --mount-proc --fork /bin/bash
[root@testerfans ~]# echo $$ && readlink /proc/$$/ns/pid
1
pid:[4026532292]
[root@testerfans ~]# unshare --pid --mount-proc --fork /bin/bash
[root@testerfans ~]# echo $$ && readlink /proc/$$/ns/pid
1
pid:[4026532294]
[root@testerfans ~]# unshare --pid --mount-proc --fork /bin/bash
[root@testerfans ~]# echo $$ && readlink /proc/$$/ns/pid
1
pid:[4026532296]
- shell2查看进程关系。
#-------------------------------shell2-------------------------------
[root@testerfans ~]# pstree -p 17554
bash(17554)───unshare(23838)───bash(23839)───unshare(23969)───bash(23970)───unshare(24079)───bash(24080)
[root@testerfans ~]# readlink /proc/23839/ns/pid
pid:[4026532292]
[root@testerfans ~]# readlink /proc/23970/ns/pid
pid:[4026532294]
[root@testerfans ~]# readlink /proc/24080/ns/pid
pid:[4026532296]
[root@testerfans ~]# grep 'NSpid' /proc/24080/status
通过对比来看,在shell2中获取到的PID namespace和步骤2中的一致。
使用
grep 'NSpid' /proc/24080/status指令我这里并未查询到信息,因为status内NSpid相关信息是在Linux内核4.1加入的,我当前演示的Centos内核为3.10。
- shell2查看嵌套关系。
通过步骤1-3我们创建了嵌套PID namespace并且确认均已经确认成功,但目前我们还看不出namespace之间的嵌套关系。
#-------------------------------shell2-------------------------------
[root@testerfans ~]# pstree -p 17554
bash(17554)───unshare(23838)───bash(23839)───unshare(23969)───bash(23970)───unshare(24079)───bash(24080)
[root@testerfans ~]# nsenter --mount --pid -t 23970 /bin/bash
[root@testerfans /]# pstree -p
bash(1)───unshare(31)───bash(32)
[root@testerfans /]# readlink /proc/32/ns/pid
pid:[4026532296]
[root@testerfans /]# readlink /proc/$$/ns/pid
pid:[4026532294]
从结果上看,这里bash(32)就是最后一个 PID namespace 中 PID为 1 的进程。但为什么pstree 命令并没有显示我们通过 nsenter 添加进来的 bash 进程呢?我们接下来看一下。
#-------------------------------shell2-------------------------------
[root@testerfans /]# ps -ef
UID        PID  PPID  C STIME TTY          TIME CMD
root         1     0  0 16:34 pts/0    00:00:00 /bin/bash
root        31     1  0 16:35 pts/0    00:00:00 unshare --pid --mount-proc --fork /bin/bash
root        32    31  0 16:35 pts/0    00:00:00 /bin/bash
root        70     0  0 17:45 pts/1    00:00:00 /bin/bash
root       105    70  0 17:51 pts/1    00:00:00 ps -ef
[root@testerfans /]# echo $$
70
我们看我们当前进程70和1号进程的PPID都为0。但PID为70进程并不属于当前 PID namespace 中 init 进程的子进程,所以不会在pstree中显示。这也是我们嵌套PID namespace和最外层PID namespace不同的地方:子PID namespace可以有多个PPID为0的进程。
再看TTY信息,可以通过它看出命令是在哪个 shell 窗口中执行的。pts/0 代表的是我们打开的第一个 shell 窗口,pts/1 代表我们打开的第二个 shell 窗口。
- 再打开一个shell窗口shell3,进入到我们创建的第一个PID namespace中,重复步骤4的步骤,确认嵌套关系。
#-------------------------------shell3-------------------------------
[root@testerfans ~]# pstree -p 17554
bash(17554)───unshare(23838)───bash(23839)───unshare(23969)───bash(23970)───unshare(24079)───bash(24080)
[root@testerfans ~]# nsenter --mount --pid -t 23839 /bin/bash
[root@testerfans /]# echo $$
137
[root@testerfans /]# pstree -p
bash(1)───unshare(31)───bash(32)───unshare(62)───bash(63)
[root@testerfans /]# readlink /proc/63/ns/pid
pid:[4026532296]
[root@testerfans /]# readlink /proc/32/ns/pid
pid:[4026532294]
[root@testerfans /]# readlink /proc/1/ns/pid
pid:[4026532292]
从上述查询结果看,在我们创建的第一个PID namespace中:
- bash(63)对应最后一个PID namespace中PID为1的进程;
- bash(32)对应创建第二个PID namespace中PID为1的进程;
- bash(1)对应创建第一个PID namespace中的PID为1的进程;
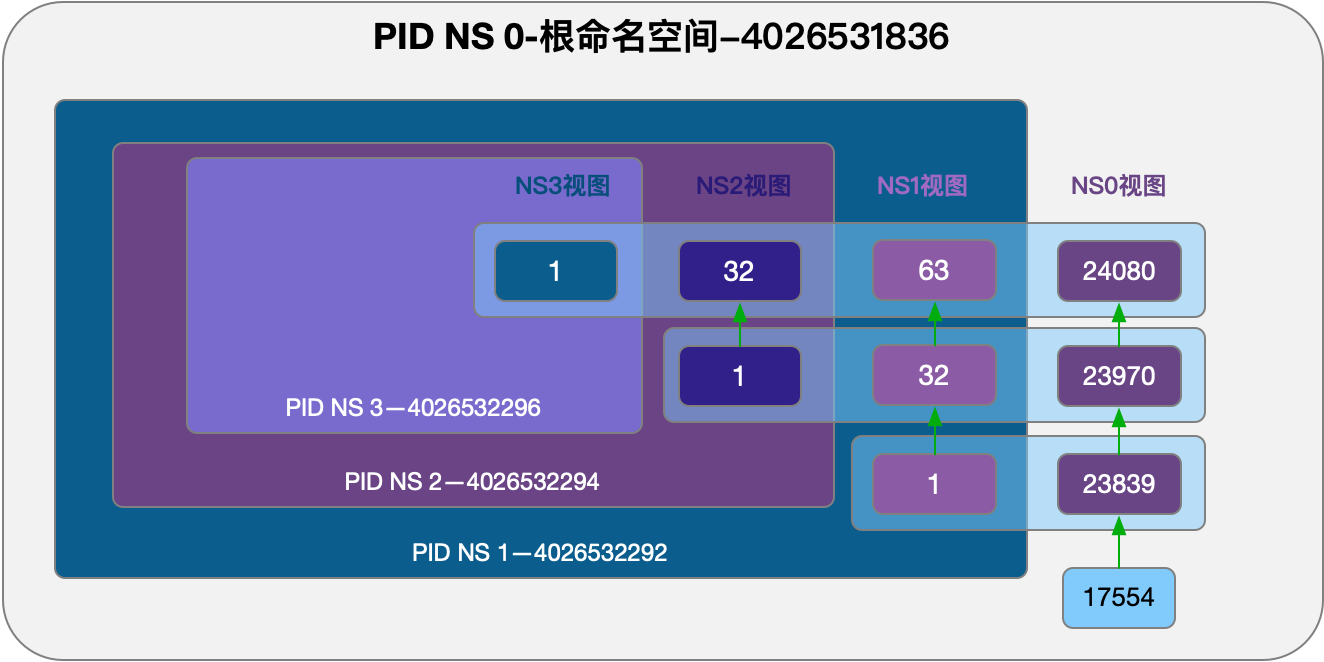
在NS0—NS4个命名空间内,大家各自看到自己的和子命名空间的PID是不同的。我们通过下图进行简单的总结。
NS0:bash(17554)─unshare(23838)─bash(23839)─unshare(23969)─bash(23970)─unshare(24079)─bash(24080)
NS1:bash(1)─unshare(31)─bash(32)─unshare(62)─bash(63)
NS2:bash(1)─unshare(31)─bash(32)
NS3:bash(1)

PID namespace 中的 init 进程
在一个新的 PID namespace 中创建的第一个进程的 PID 为 1,该进程被称为这个 PID namespace 中的 init 进程。
在 Linux 系统中,进程的 PID 从 1 开始往后不断增加,并且不能重复(当然进程退出后,PID 会被回收再利用),进程的 PID 为 1 的进程是内核启动的第一个应用层进程,被称为 init 进程(不同的 init 系统的进程名称可能不太一样)。这个进程具有特殊意义,当 init 进程退出时,系统也将退出。所以除了在 init 进程里指定了 handler 的信号外,内核会帮 init 进程屏蔽掉其他任何信号,这样可以防止其他进程不小心 kill 掉 init 进程导致系统挂掉。
不过有了 PID namespace 后,可以通过在父 PID namespace 中发送 SIGKILL 或者 SIGSTOP 信号来终止子 PID namespace 中的 PID 为 1 的进程。由于 PID 为 1 的进程的特殊性,当这个进程停止后,内核将会给这个 PID namespace 里的所有其他进程发送 SIGKILL 信号,致使其他所有进程都停止,最终 PID namespace 被销毁掉。
当一个进程的父进程退出后,该进程就变成了孤儿进程。孤儿进程会被当前 PID namespace 中 PID 为 1 的进程接管,而不是被最外层的系统级别的 init 进程接管。
试验1:孤进程只被当前PID namespace下的init进程接管
方便演示我们打开两个shell,分别为shell1和shell2,shell1创建三个嵌套namespace分别命名为 namespace 1-3。试验1均为在shell1中演示。
- 查看当前进程信息。
#-------------------------------shell1-------------------------------
[root@testerfans ~]# echo $$ && readlink /proc/$$/ns/pid
15426
pid:[4026531836]
- 创建三层嵌套PID namespace。
#-------------------------------shell1-------------------------------
[root@testerfans ~]# unshare --mount --uts --pid --mount-proc --fork /bin/bash
[root@testerfans ~]# echo $$ && readlink /proc/$$/ns/pid
1
pid:[4026532293]
[root@testerfans ~]# unshare --mount --uts --pid --mount-proc --fork /bin/bash
[root@testerfans ~]# echo $$ && readlink /proc/$$/ns/pid
1
pid:[4026532296]
[root@testerfans ~]# unshare --mount --uts --pid --mount-proc --fork /bin/bash
[root@testerfans ~]# echo $$ && readlink /proc/$$/ns/pid
1
pid:[4026532299]
IPD namespace1 = pid:[4026532293]
IPD namespace2 = pid:[4026532296]
IPD namespace3 = pid:[4026532299]
- shell内启动两个bash。
#-------------------------------shell1-------------------------------
[root@testerfans /]# bash
[root@testerfans /]# bash
- 利用 unshare、nohup 和 sleep 命令组合,创建出父子进程。下面的命令 fork 出一个子进程并在后台 sleep 一小时。
#-------------------------------shell1-------------------------------
[root@testerfans ~]# unshare --fork nohup sleep 3600&
[root@testerfans ~]# pstree -p
bash(1)───bash(31)───bash(60)─┬─pstree(91)
                              └─unshare(89)───sleep(90)
- 查看进程关系。
#-------------------------------shell1-------------------------------
[root@testerfans ~]# pstree -p 15426
bash(15426)───unshare(15933)───bash(15934)───unshare(16072)───bash(16073)───unshare(16205)───bash(16206)───bash(16263)───bash(16299)───unshare(16534)───sleep(16535)
- kill 掉进程 unshare(89)。
#-------------------------------shell1-------------------------------
[root@testerfans ~]# kill 89
[root@testerfans ~]# pstree -p
bash(1)─┬─bash(31)───bash(60)───pstree(92)
        └─sleep(90)
这里和我们预期的一样,当我们kill掉89号进程后,sleep(90)进程被bash(1)接管,也就是当前PID namespace的init进程。
- kill 掉进程 sleep(90)并执行
unshare --fork nohup sleep 3600&。
#-------------------------------shell1-------------------------------
[root@testerfans ~]# kill 90
[root@testerfans ~]# unshare --fork nohup sleep 3600&
[root@testerfans ~]# pstree -p
bash(1)───bash(31)───bash(60)─┬─pstree(95)
                              └─unshare(93)───sleep(94)
我们得到了和刚才相同的进程关系,只是进程的 PID 发生了一些变化。
试验2:在父PID namespace内kill子PID namespace下的父进程,孤儿进程只被所在PID namespace下的init进程接管
- 在shell2中通过
nsenter --mount --pid -t 15934 /bin/bash进入到IPD namespace 1中,使用kill杀掉IPD namespace3中的unshare(156)进程,观察sleep(157)被接管情况。
#-------------------------------shell2-------------------------------
[root@testerfans ~]# nsenter --mount --pid -t 15934
[root@testerfans /]# pstree -p
bash(1)───unshare(32)───bash(33)───unshare(63)───bash(64)───bash(94)───bash(123)───unshare(156)───sleep(157)
[root@testerfans /]# kill 156
[root@testerfans /]# pstree -p
bash(1)───unshare(32)───bash(33)───unshare(63)───bash(64)─┬─bash(94)───bash(123)
                                                          └─sleep(157)
我们发现kill掉unshare(156)之后sleep(157)被IPD namespace 3中的bash(64)接管,即被IPD namespace 3中的init进程接管,并未被bash(1)(IPD namespace 1的init进程)接管。
- 接下来我们使用命令
kill -SIGKILL 64销毁IPD namespace 3中的init进程。
#-------------------------------shell2-------------------------------
[root@testerfans /]# kill -SIGKILL 64
[root@testerfans /]# pstree -p
bash(1)───unshare(32)───bash(33)
在shell2中使用kill -SIGKILL 64 销毁IPD namespace 3中的init进程后,我们在shell1中会看到Killed提示,并退出到IPD namespace 2中。
#-------------------------------shell1-------------------------------
[root@testerfans ~]# Killed
[root@testerfans ~]# readlink /proc/$$/ns/pid
pid:[4026532296]
这说明在IPD namespace 1中使用kill -SIGKILL 64销毁IPD namespace 3中的init进程后,IPD namespace 3也会被销毁回收。
总结
通过本篇对PID namespace有了一个基本了解,我们对上述内容进行简要的总结:
- 我们可以通过
unshare --uts --mount --pid --fork /bin/bash创建一个新的PID namespace。 - PID namespace存在嵌套。
- 当前PID namespace下的孤儿进程只能被当前命名空间下的init进程托管。
- 当使用-SIGKILL指令杀死命名空间内的init进程,此命名空间也会被销毁回收。
下一章我们将继续介绍Linux 的user namespace。
本文参考:
Linux Namespace : PID


评论区